k3s on a Raspberry Pi 4 at home, Part 1
by Darkstar
In this series of posts we will look at setting up a Raspberry Pi 4 at home to serve multiple websites under different (sub-)domains.
- Motivation
- Requirements
- Goal
- Setting up your RaspberryPi
- Setting up your Router
- Setting up your DNS Domain
Motivation
There are various pages on the internet that describe such a scenario, but they are all lacking in some respect, at least considering my (personal) requirements:
- They either use old versions of Kubernetes (with old API versions or schemas), or don’t use Kubernetes at all (which is a no-go these days)
- They serve only one website, not multiples on different subdomains
- They don’t take into account the ephemerality of home internet connections which require periodic DNS updates
- They use old docker images, or images that only run on x86_64 (which will obviously not work on a Raspberry Pi)
- …and the list goes on
So that is why I elected to take bits and pieces from various tutorials available on the web, augmented them with some of my own research, updated them to 2021, and published the results here. What you will find here are the exact scripts that I use to host my own domain at home. The only things I changed are, of course, any passwords and secrets, as well as the toplevel domain name. It is a RaspberryPi after all, and hammering it with thousands of requests from around the world will probably DDoS me out of existence…
Still, I hope that some of you will find this information useful, if only as a starting point for your own experiments with Kubernetes. The experience is in building this stuff, and learning something useful on the way, not in getting a ready-to-run setup that works out-of-the-box.
So without further ado, let’s start with part 1, preparing the Raspberry Pi.
Requirements
Here is a list of things that you will need if you want to play along
-
A RaspberryPi. Of course. Since k3s (which we will be using as “lightweight” Kubernetes variant) still requires lots of CPU and RAM, a RaspberryPi 4 is probably the minimum you should have.
Alternatively, you can use any other Linux-based computer or NAS that you might have lying around, as long as its specs meet or exceed the RaspberryPi’s. If you use an x86_64 based system, some steps below will be different for you, but I will call that out later.
You can also use a VPS server or cloud hosting with a provider of your choice. Just make sure that you don’t choose the smallest VM size, as more often than not these are not powerful enough to run Kubernetes.
-
An SD card for your RaspberryPi (to boot from), and optionally (but highly recommended) a USB stick which will contain all the data for your services.
Technically, you can put everything on the SD card, but SD cards tend to not be as reliable as USB sticks or even external SSDs. Note that with an external SSD, you will almost certainly need a powered USB hub, as the RaspberryPi doesn’t supply that much power to its USB ports.
- A DNS domain. This can be literally any domain, a
.com,.net,.org, or one of the newer ones like.ioor.pizza. In this guide we will be usingdark.star(which is sadly not open for public registrations). - A DNS hoster with which you registered the domain. I use DomainDiscount24 (no affiliation) just because they are inexpensive and provide a large selection of TLDs to choose from. Make sure your provider allows you to register dynamic DNS entries by using an URL, as that will become important later. Bonus points if they also let you register arbitrary
CNAME,TXT,SRV, etc. records for your domain (nice, but not really required unless you want to redirect one of your subdomains to Google or Azure, as they require you to create custom TXT resources as part of their authentication scheme) - A router with port forwarding capabilities (this should include most routers, but make sure that you know how/where to configure it)
Goal
The goal for this tutorial is simple: We want to set up a RaspberryPi from scratch, install and configure k3s on it, and then have it host two relatively simple websites, a static site under http://web.dark.star and a WordPress instance under http://wp.dark.star, both with plain HTTP and with HTTPS.
An explicit non-goal, at least for this first iteration, is dynamic volume provisioning using a CSI provider. This just complicates things, and as long as we are using a single-node k8s cluster, a simple “host directory” style volume mount is more than sufficient.
Setting up your RaspberryPi
First we want to setup our RaspberryPi with a Raspbian (or PiOS, as it’s officially called) image. Note that we will still be using the old “Buster” based image (based on Debian 10), even though “Bullseye” (Debian 11) has been released a few days ago. This is mainly because this is what I started with. Chances are that Bullseye will work just as well, but to have a known-working configuration, we will stick with Buster here.
Also note that we will be using the unofficial 64bit beta version of these images, because it probably gives us a little performance boost, as we can then use the arm64 binaries instead of the old armhf ones.
The exact image I used is available on the RaspberryPi download server
Download and extract the ZIP file, you will get an IMG file that you can write to your SD card using Win32DiskImager (or any other similar tool)
Before you put the card in your RaspberryPi, there is one thing you still need to do, which is adding an empty file to the SD card so that when Raspbian starts up it will already listen for SSH connections. This is required if you run your RaspberryPi headless (i.e. without a display attached). To do that, create an empty file named ssh (no extension) on the BOOT partition of the SD card:

If you have many devices on your home network, or your DHCP server (i.e. router, in most cases) doesn’t supply you with a GUI to see all DHCP leases, now would be a good time to run a simple nmap -sn 192.168.1.0/24 (change the IP range to your network range, of course) on your home network, to see which IP adresses are currently active, so that you can find the newly-allocated IP for your RaspberryPi easier.
darkstar@linux:~ $ nmap -sn 192.168.1.0/24

Starting Nmap 7.40 ( https://nmap.org ) at 2021-11-11 17:34 CET
Nmap scan report for speedport.ip (192.168.1.1)
Host is up (0.0095s latency).
Nmap scan report for pi.hole (192.168.1.2)
Host is up (0.0089s latency).
Nmap scan report for 192.168.1.99
Host is up (0.0098s latency).
Nmap scan report for 192.168.1.162
Host is up (0.0076s latency).
Nmap scan report for 192.168.1.178
Host is up (0.091s latency).
Nmap scan report for Chromecast.darkstar.intra (192.168.1.192)
Host is up (0.033s latency).
Nmap done: 256 IP addresses (6 hosts up) scanned in 3.09 seconds
Plug the SD card in your RaspberryPi, connect it to the network (wired ethernet is recommended, if you want/need to use WiFi, there is documentation online about how to specify the SSID and passphrase with another simple config file in the BOOT partition) and wait a few minutes for it to initally boot, adjust the partition size, reboot and acquire a DHCP lease.
Now either check in your router or with another call to nmap -sn 192.168.1.0/24 which IP got allocated to your RaspberryPi.
darkstar@linux:~ $ nmap -sn 192.168.1.0/24

Starting Nmap 7.40 ( https://nmap.org ) at 2021-11-11 17:34 CET
Nmap scan report for speedport.ip (192.168.1.1)
Host is up (0.0095s latency).
Nmap scan report for pi.hole (192.168.1.2)
Host is up (0.0089s latency).
Nmap scan report for 192.168.1.99
Host is up (0.0098s latency).
Nmap scan report for 192.168.1.162
Host is up (0.0076s latency).
Nmap scan report for 192.168.1.167
Host is up (0.0036s latency).
Nmap scan report for 192.168.1.178
Host is up (0.091s latency).
Nmap scan report for Chromecast.darkstar.intra (192.168.1.192)
Host is up (0.033s latency).
Nmap done: 256 IP addresses (7 hosts up) scanned in 3.09 seconds
In this case we see that the RaspberryPi got the IP Address 192.168.1.167.
Try logging in with SSH, this should work out of the box (the default username is pi and the default password is raspberry):
pi@raspberrypi:~ $ ssh pi@192.168.1.167
The authenticity of host '192.168.1.167 (192.168.1.167)' can't be established.
ECDSA key fingerprint is SHA256:Qy/vVEj7qreuhefe2Hbpfzm+Sd2taYs3ererCWWCGRA.
Are you sure you want to continue connecting (yes/no)? yes
Warning: Permanently added '192.168.1.167' (ECDSA) to the list of known hosts.
pi@192.168.1.167's password:
Linux raspberrypi 5.10.63-v8+ #1459 SMP PREEMPT Wed Oct 6 16:42:49 BST 2021 aarch64

The programs included with the Debian GNU/Linux system are free software;
the exact distribution terms for each program are described in the
individual files in /usr/share/doc/copyright.

Debian GNU/Linux comes with ABSOLUTELY NO WARRANTY, to the extent
permitted by applicable law.
Last login: Thu Nov 11 16:48:35 2021 from 192.168.1.162

SSH is enabled and the default password for the 'pi' user has not been changed.
This is a security risk - please login as the 'pi' user and type 'passwd' to set a new password.

Wi-Fi is currently blocked by rfkill.
Use raspi-config to set the country before use.

pi@raspberrypi:~ $
The first thing you want to do now is to configure the RaspberryPi to some static IP address, to make sure it will always be accessible. In our case this will be 192.168.1.3, but your IP might be different. To do that we simply need to edit the file /etc/dhcpcd.conf and set the static IP there (yes, there are other ways, but this is the suggested solution for Raspbian, so we just go along with it):
pi@raspberrypi:~ $ sudo vi /etc/dhcpcd.conf
...
# Example static IP configuration:
interface eth0
static ip_address=192.168.1.3/24
static routers=192.168.1.1
static domain_name_servers=192.168.1.2
...
Be sure to include the correct IP address for your gateway and DNS server. Save the file and reboot your RaspberryPi with sudo systemctl reboot to pick up the new configuration.
It is also a good idea to set a new password for the pi user (by typing passwd at the prompt).
After rebooting, your RaspberryPi should be accessible on the configured IP. If not, you can either try and debug it by attaching a screen and keyboard, or re-flash the image and start from scratch. If you’re lucky you will still be able to access it using the old DHCP-assigned IP though.
We now need to configure some basics of the system, so log in to your pi and issue the following commands:
sudo systemctl enable multi-user.target
sudo systemctl set-default multi-user.target
This will disable the graphical login, which will save us some resources as we’re running headless anyway.
Now add the parameters cgroup_memory=1 cgroup_enable=memory to the end of the line in the file /boot/cmdline.txt so that it looks like this, all in one line:
console=serial0,115200 console=tty1 root=PARTUUID=aa1193df-02 rootfstype=ext4 elevator=deadline
fsck.repair=yes rootwait quiet splash plymouth.ignore-serial-consoles cgroup_memory=1 cgroup_enable=memory
If you’re using an USB stick or external SSD for your data, partition and format it:
sudo fdisk /dev/sda
...
sudo mkfs.ext4 -L k8s-data /dev/sda1
Note that I’m using a label for the filesystem here, which makes mounting it more consistent as it doesn’t matter which physical device node it is on (sda, sdb, etc.)
If you’re not using a RaspberryPi, make sure that you partition/format the right disk here, as /dev/sda might be your bootdisk.
Now create a junction point where to mount it to (we will use /k8s-data):
sudo mkdir /k8s-data
And put this in your /etc/fstab:
LABEL=k8s-data /k8s-data ext4 defaults 0 0
Do a mount -a and check if /k8s-data is properly mounted (for example by using df).
Another good idea, at least on a RaspberryPi with an SD card, is to disable swap entirely. There have been known problems with swap enabled and k3s, and the 100mb swapfile that Raspbian creates is not very helpful anyway, since it is so small.
To disable swap, use the following commands:
pi@raspberrypi:~ $ sudo dphys-swapfile swapoff
pi@raspberrypi:~ $ sudo dphys-swapfile uninstall
pi@raspberrypi:~ $ sudo update-rc.d dphys-swapfile remove
pi@raspberrypi:~ $ sudo apt-get purge -y dphys-swapfile
Another source of many annoying problems is a broken version of the iptables command that Raspbian apparently ships. If you have an iptables version of 1.8.2 (or anything lower than 1.8.6 apparently) then you might see increased CPU and memory load on your RaspberryPi over the next few days, caused by the iptables firewall rules growing to multiple megabytes due to repeated redundant entries. K3s actually ships their own version of the iptables binary, and that one is version 1.8.6, which works fine. To check your current iptables size you can use this command:
pi@raspberrypi:~ $ sudo iptables -L | wc -c
# Warning: iptables-legacy tables present, use iptables-legacy to see them
4675712
The easiest way to fix this issue is to simply remove the iptables and/or nftables binary from Raspbian to force k3s to use its bundled version:
pi@raspberrypi:~ $ iptables --version
iptables v1.8.2 (nf_tables)
pi@raspberrypi:~ $ sudo apt-get remove -y iptables nftables
Finally, install some helpful packages and update the whole system by doing a full upgrade followed by a reboot:
sudo apt-get update --allow-releaseinfo-change && \
sudo apt-get install -y dig jq vim && sudo apt-get -y dist-upgrade && \
sudo apt-get -y autoremove && sudo apt-get autoclean
sudo systemctl reboot
After that reboot, your RaspberryPi should be ready!
Setting up your Router
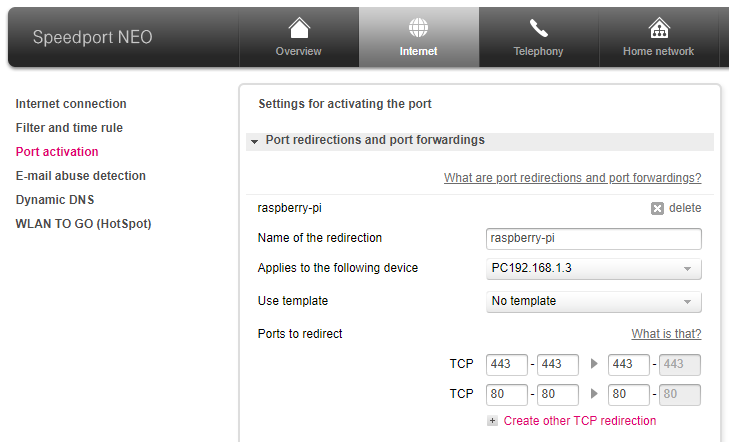
Now configure your router to forward incoming ports 80 and 443 to your RaspberryPi (192.168.1.3 in our case). As this is very router-specific, a detailed guide cannot be given here.
On the Speedport Neo (OEM router from Deutsche Telekom), the option is under “Internet”, “Port activation”:
To test if it works, you can try the following on your RaspberryPi:
pi@raspberrypi:~ $ curl -s icanhazip.com
198.51.100.17
pi@raspberrypi:~ $ mkdir /tmp/foo
pi@raspberrypi:~ $ cd /tmp/foo
pi@raspberrypi:/tmp/foo $ sudo python -m http.server 80
Serving HTTP on :: port 80 (http://[::]:80/) ...
Now connect to your public IP (198.51.100.17 in this case), preferably from somewhere external, but it should also work from a different PC in your WiFi/LAN. If you get an empty directory listing, everything should be fine and you can stop the web server by pressing CTRL-C.
Setting up your DNS Domain
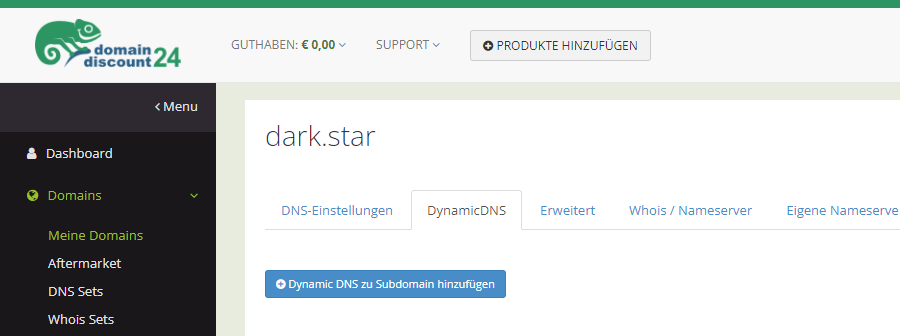
This section is again very specific to the actual provider you are using for your domains. In the case of DomainDiscount24, the steps to create a Dynamic DNS zone are pretty simple.
Log in to the web interface and select the domain you want to configure. Click on the second tab, the one called “DynamicDNS”, and then on the button “Add Dynamic DNS to a subdomain”:
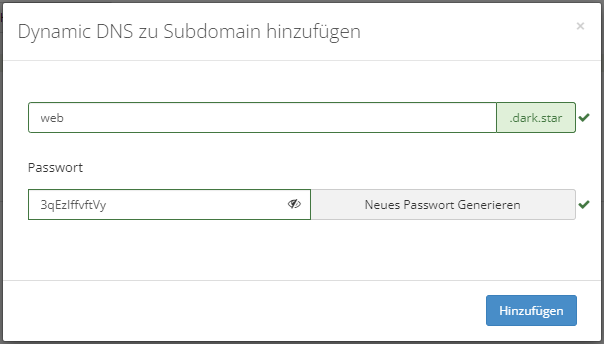
In the window that pops up, enter the new subdomain (web in this case) and note that the password might be auto-filled by your browser so you should generate a new one to be safe. You can always view this password again later so there is no need to write it down now.
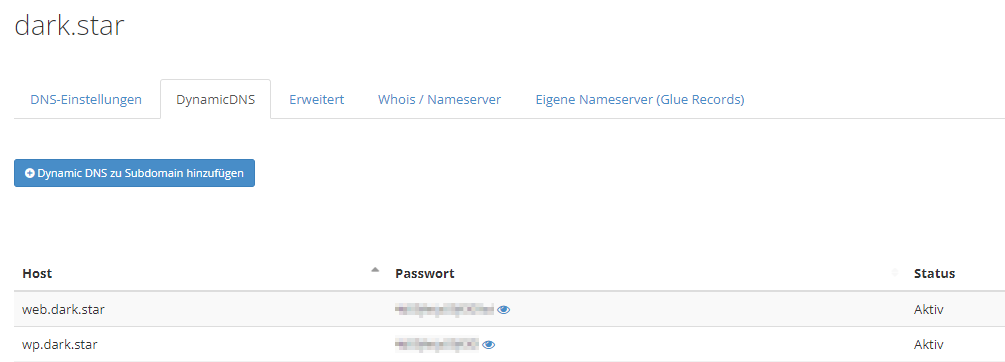
After doing this step twice, once for each of your two subdomains (web and wp), the overview page should look similar to this (note that you can click the little eye icon to reveal the password for that particular entry):
Now look in the box at the bottom of the page for the URLs you need for the dynamic update. You can update your DNS record at any time by simply accessing an URL from the system that you want the domain to point to. In the case of DomainDiscount24, the URL looks like this:
https://dynamicdns.key-systems.net/update.php?hostname=<hostname>&password=<password>&ip=auto
Where <hostname> is the full hostname (web.dark.star or wp.dark.star in our case) and <password> is the password that was generated for that subdomain. This URL and the two parameters (or four, actually, since we have two subdomains) will be important later, so copy them somewhere.
If you call curl with one of these host/password combinations from your RaspberryPi, you should be able to do an nslookup or dig request within a couple of minutes and see your IP being returned. Don’t forget to put quotes around the URL, otherwise your shell will try and interpret it:
pi@raspberrypi:~ $ curl -s "https://dynamicdns.key-systems.net/update.php?hostname=web.dark.star&password=secret123&ip=auto"
...wait a bit...
pi@raspberrypi:~ $ dig +short web.dark.star
198.51.100.17
This shows that Dynamic DNS is working as expected.
That’s all for today. Stay tuned, in the next part we will be actually setting up k3s and installing cert-manager into it, which will allow us to request and install TLS certificates from LetsEncrypt.
tags: raspberrypi - k3s